2.4 编写 Tile Kernel(Writing Tile Kernels)
CUDA Tile 提供了一种不同于前面章节所介绍的单指令多线程(SIMT)模型的 GPU kernel 编写方式。Tile 编程允许程序员以不同方式表达并行性,并将最低层次的并行性留给编译器和内置操作。这样,tile 就提供了一种更简单的方式,用于访问 NVIDIA GPU 的新近性能特性,例如 Tensor Memory Accelerator(TMA)单元和 tensor core。
- CUDA Tile 编程可以通过 cuTile Python package
cuda.tile使用。 - 从 CUDA Toolkit 13.3 开始,可以使用 CUDA Tile C++。
围绕 tile kernel 的应用代码——例如分配 device memory、在 host 和 device 之间传输数据、安排 kernel 启动顺序——与前面章节描述的 SIMT kernel 完全相同。Tile kernel 在使用标准 CUDA API 分配的 global memory 上运行,其结果也以同样方式复制回 host。唯一改变的是程序员在 kernel 内部编写的代码。
在 SIMT kernel 中,程序员以单个线程为单位思考:计算全局线程索引、加载该线程负责的元素、对元素执行操作并存储结果。在 tile kernel 中,程序员以整个 block 为单位思考:加载包含许多元素的 tile、对整个 tile 执行操作并存储结果。编译器负责将 tile 操作映射到每个 block 的硬件线程,而这部分工作在 SIMT 编程中需要程序员显式处理。
本节只关注这种差异:如何编写 kernel 入口以及其中的 tile 操作。每个模式都同时使用 CuTile Python(cuda.tile)和 CUDA Tile C++(cuda::tiles)演示;二者共享 CUDA Tile IR 编译后端,因此具有相同的执行语义。
按照惯例,两种语言中的 tile API 都别名为 ct:
- Python:
import cuda.tile as ct; - C++:
namespace ct = cuda::tiles。
Python 中,tile API 位于 cuda.tiles 模块中,导入方式如上。C++ 中,tile API 位于 cuda::tiles 命名空间,由 cuda_tile.h 头文件暴露:
#include "cuda_tile.h"
namespace ct = cuda::tiles;
下面代码片段中的 ct. / ct:: 前缀,表示当前所读语言中的 tile API。
2.4.1 Kernel 与 Function 声明(Kernel and Function Declarations)
Tile kernel 是 GPU 入口点,在启动 grid 中每个 block 执行一次。Tile function 可以从 tile kernel 或其他 tile function 调用,但它本身不是入口点。与 SIMT kernel 一样,tile kernel 不能直接从 host code 调用,必须启动。
在 CUDA Tile C++ 中:
__tile_global__是__global__的 tile 对应形式,用于标记 tile kernel 入口点;__tile__是__device__的 tile 对应形式,表示应为 GPU 编译、并且可以从其他__tile__或__tile_global__function 调用的函数。
数组参数和标量参数的传递方式与 SIMT kernel 相同。Tile code 和 SIMT code 可以共存:一个 .cu 文件可以同时定义 __tile_global__ 和 __global__ kernel,一个 host program 也可以同时启动二者。
注意
当前,
__tile__function 不能从__global__或__device__function 调用;同样,__device__function 不能从__tile_global__或__tile__function 调用。CUDA 的后续版本可能会解除这一限制。
在 cuTile Python 中:
@ct.kernel装饰器标记 tile kernel 入口点;@ct.function装饰器标记可以从 tile kernel 或其他 tile function 调用的函数。
实际上,从 kernel 调用的任意 function 都会自动编译为 tile code,因此 @ct.function 装饰器是可选的。数组参数可以接受任何位于 device、并暴露 DLPack 或 CUDA Array Interface 的 array,例如 PyTorch tensor 和 CuPy array。标量参数直接传递。
C++
#include "cuda_tile.h"

// Tile kernel 入口点。不能直接调用,必须启动。
__tile_global__ void my_kernel(float* a, float* b, float* c) {
    ...
}

// Tile function。可以从 tile kernel 和 tile function 调用。
__tile__ float helper(float x, float y) {
    return x + y;
}
Python
import cuda.tile as ct

# Tile kernel 入口点。不能直接调用,必须启动。
@ct.kernel
def my_kernel(a, b, c):
    ...

# Tile function。可以从 tile kernel 和 tile function 调用。
# @ct.function 是可选的,从 tile code 调用的 function
# 会自动编译为 tile code。
@ct.function
def helper(x, y):
    return x + y
2.4.2 启动 Kernel(Launching Kernels)
Tile kernel 在 tile block grid 上启动,就像 SIMT kernel 在 thread block grid 上启动一样。程序员指定最多三维的 grid shape。从程序员角度看,每个 tile block 由一个逻辑线程执行;block 内的并行性由编译器管理。
在 C++ 中,tile kernel 复用 SIMT 熟悉的三尖括号启动语法。第一个尖括号参数是 grid shape(tile block 数量);第二个是 SIMT 中的每 block 线程数。对于 tile kernel,编译器在内部决定线程数,因此第二个参数必须是 1。Tile kernel 也是普通 CUDA kernel,因此还可以通过 runtime 中已有的 cudaLaunchKernel 和 cudaLaunchKernelEx API 启动,配置同样是 grid, 1。当把 tile kernel 集成到已经通过这些 API 驱动启动的代码库时,这一点很有用。
在 Python 中,ct.launch 接收四个位置参数:CUDA stream、指定每个维度 tile block 数量的 grid tuple、kernel object,以及 kernel 参数 tuple。
C++
my_kernel<<<dim3(num_blocks_x, num_blocks_y), 1>>>(a, b, c); // 第二个参数必须为 1
Python
import torch

stream = torch.cuda.current_stream()     # CUDA stream object
grid = (num_blocks_x, num_blocks_y, 1)   # tile-block grid (x, y, z)
ct.launch(stream, grid, my_kernel, (a, b, c))
2.4.2.1 Grid 大小模式(Grid-Sizing Pattern)
常见模式是启动足够多的 block 覆盖完整数组,包括最后一个可能在一个或多个维度上超出数组大小的 block。
C++
int num_blocks = (N + tile_size - 1) / tile_size;   // 向上整除,覆盖尾部不完整部分
kernel<<<num_blocks, 1>>>(in, out, N);
Python
import math

grid = (math.ceil(N / TILE),)   # 向上整除,覆盖尾部不完整部分
ct.launch(stream, grid, my_kernel, (arr_in, arr_out, TILE))
当数组大小不能被 tile 大小整除时,如何处理这一情况将在加载和存储 Tile的子节中讨论。
2.4.3 查询 Block 位置(Querying Block Position)
每个 block 都需要知道自己在 grid 中的位置,以确定要处理数据的哪一部分。在 SIMT 中,程序员组合 blockIdx 和 threadIdx 计算全局线程索引。在 tile code 中只需要 block index,block 内所有线程级的索引由编译器处理。
在 C++ 中,ct::bid() 返回一个 uint3,包含三个维度的 block index;ct::num_blocks() 返回一个 dim3,包含每个维度的 block 总数(由 kernel 启动参数决定)。单独的分量通过 .x、.y、.z 访问。
在 Python 中,ct.bid(axis) 返回当前 block 沿给定 axis(0、1 或 2)的 index,类型为 int32 scalar;ct.num_blocks(axis) 返回该 axis 上的 block 总数,可用于边界检查和循环计数。
C++
#include "cuda_tile.h"

__tile_global__ void my_kernel(float* a, float* b, float* c) {
    namespace ct = cuda::tiles;
    int bid_x = ct::bid().x;          // .x 方向的 block index
    int bid_y = ct::bid().y;          // .y 方向的 block index
    int num_x = ct::num_blocks().x;   // .x 方向的 block 总数
}
Python
@ct.kernel
def my_kernel(a, b, c):
    bid_x = ct.bid(0)          # axis 0 上的 block index
    bid_y = ct.bid(1)          # axis 1 上的 block index
    num_x = ct.num_blocks(0)   # axis 0 上的 block 总数
2.4.4 创建 Tile(Creating Tiles)
确定 block 的身份后,下一个问题是 tile kernel 实际操作什么。Tile 是一个固定大小、多维的 scalar element 数组,其 shape 和元素类型在编译时已知。Tile 的每个维度都必须是 2 的幂。Tile 具有值语义,也就是说,复制一个 tile 会复制其中的元素,两个副本完全独立。不过,由于编译器控制 tile 在硬件中的内部表示,复制操作代价很低。程序员不需要为 tile 分配或释放内存。
实际中,tile 通常通过从 array 加载数据(见Tile-Space Load 和 Store)创建,或者通过生成指定模式填充 tile 的 factory function 创建。
在 C++ 中,tile 类型明确写出:ct::tile<T, ct::shape<dims...>>。其中 T 是元素类型,ct::shape<dims...> 通过 template argument 编码维度,整数值是各轴的编译时大小。例如,ct::tile<float, ct::shape<8>> 是包含 8 个 float 的一维 tile,ct::tile<float, ct::shape<4, 4>> 是 4×4 的 float tile。由于 shape 是类型的一部分,它始终在编译时已知。
Factory function 将完整的 tile 类型(下面记作 Tile)作为 template parameter:
ct::zeros<Tile>()和ct::ones<Tile>():分别生成全为 0 或全为 1 的 tile;ct::full<Tile>(val):生成每个元素都为val的 tile;ct::iota<Tile>():生成包含(0, 1, ..., N-1)的 tile,其中N是 tile 大小。
本节的 C++ 示例使用 using alias(例如 using f32x4x4 = ct::tile<float, ct::shape<4, 4>>)让调用处的 tile 类型更易读。
在 Python 中,tile factory 的 shape tuple 和 dtype 参数都是编译时值。Python literal(例如 (64, 64) 和 ct.float32)天然满足这一要求;也可以使用下面 Python Constant[T] 中所示的 Constant 注解 kernel 参数。生成的 tile 暴露 .shape、.dtype 和 .ndim 属性,分别反映其编译时属性。
Python factory function 包括:
ct.zeros(shape, dtype)和ct.ones(shape, dtype):分别生成全为 0 或全为 1 的 tile;ct.full(shape, fill_value, dtype):生成任意常量值填充的 tile;ct.arange(size, dtype=...):生成包含[0, 1, ..., size-1]的一维 tile。
C++
#include "cuda_tile.h"

__tile__ void factories() {
    namespace ct = cuda::tiles;

    using i32x8   = ct::tile<int,   ct::shape<8>>;      // 一维:8 个 int
    using f32x4x4 = ct::tile<float, ct::shape<4, 4>>;   // 二维:4x4 个 float

    auto z      = ct::zeros<f32x4x4>();       // 全为 0
    auto o      = ct::ones<f32x4x4>();        // 全为 1
    auto filled = ct::full<f32x4x4>(3.14f);   // 全为 3.14
    auto seq    = ct::iota<i32x8>();          // {0, 1, 2, 3, 4, 5, 6, 7}
}
Python
import cuda.tile as ct

@ct.function
def factories():
    zeros  = ct.zeros((64, 64), dtype=ct.float32)      # 64x64、全为 0.0 的 tile
    ones   = ct.ones((128,), dtype=ct.float16)         # 128 元素、全为 1.0 的 tile
    filled = ct.full((32, 32), 3.14, dtype=ct.float32) # 32x32、全为 3.14 的 tile
    seq    = ct.arange(8, dtype=ct.int32)              # [0, 1, 2, 3, 4, 5, 6, 7]
2.4.5 编译时常量(Compile-Time Constants)
Tile compiler 会针对 tile shape、数据类型和其他结构参数的每种组合生成专用机器代码。因此,影响生成代码的值必须在编译时已知,也就是说,tile 的 shape 和数据类型必须在编译时已知。创建 Tile中使用 literal 指定 tile shape 和数据类型,例如 ct.zeros((64, 64), dtype=ct.float32) 和 ct::tile<int, ct::shape<8>>。
Shape 也可以通过 kernel interface 作为编译时已知值传入,具体见下面的章节。
2.4.5.1 Python Constant[T]
kernel 参数上的 ct.Constant[T] type hint 会将其标记为嵌入常量(constant-embedded)。这意味着 kernel 内每次使用该参数时,都表现得像把 literal value 直接写在该位置。类型参数可选:不带类型参数的 ct.Constant 可以嵌入任意类型的常量。ct.Constant 最常用于 integer,即 ct.Constant[int],并用于驱动 tile shape 和循环边界的参数。
import cuda.tile as ct

@ct.kernel
def my_kernel(TILE: ct.Constant[int]):
    # TILE 是嵌入常量:无论 TILE 出现在哪里,编译器都看到其 literal value
    # (例如 128),并生成专用代码。这里 TILE 驱动 factory-built tile 的 shape。
    zeros = ct.zeros((TILE,), dtype=ct.float32)
2.4.5.2 C++ integral_constant 与 _ic Literal
在 CUDA Tile C++ 中,通过 ct::integral_constant 表达编译时值;其数值编码在类型自身中。ct::literals 命名空间中的 _ic literal 提供简洁写法:0_ic 会生成一个 ct::integral_constant<0> 值。
接收编译时值的 API 同时接受非类型 template parameter(NTTP)形式和 _ic literal 形式。例如,ct::cat 沿给定维度连接两个 tile,该维度必须在编译时已知。下面两行以相同的编译时 axis 调用 ct::cat,区别只是编译时值写的位置不同:
#include "cuda_tile.h"

__tile__ void concat_demo() {
    namespace ct = cuda::tiles;
    using namespace ct::literals;

    using T = ct::tile<int, ct::shape<4, 8>>;
    T lhs = ct::full<T>(0);
    T rhs = ct::full<T>(1);

    auto a = ct::cat<0>(lhs, rhs);     // NTTP 形式
    auto b = ct::cat(lhs, rhs, 0_ic);  // _ic 形式
}
_ic literal 还经常出现在另一个位置。ct::extents 和 ct::shape 都有 NTTP 形式(例如 ct::extents<std::uint32_t, 4, 8>)和 brace 形式。与 NTTP 形式不同,brace 形式接受 runtime value,因此当一个或多个维度只有在启动时才知道时,应使用 brace 形式:对编译时维度使用 _ic literal,对运行时维度使用普通变量。Tile-space API(例如下面Tile-Space Load 和 Store中介绍的 ct::tensor_span 和 ct::partition_view)使用这种形式包装此类数组:
auto shape2d = ct::extents{8_ic, length}; // 8 在编译时已知,length 在运行时已知
只要 value-form API 参数要求编译时值,_ic literal 都是统一的简写方式,例如 ct::cat 的维度,或 extents、shape 的组成部分。
2.4.6 加载和存储 Tile(Loading and Storing Tiles)
正如 1.2.2.3.1 节首次介绍的,CUDA tile 编程模型中有两种关键内存对象:tile 和 array。Array 是位于 global memory 中、对 tile kernel 的所有 block 可见的多维元素容器;tile 也是多维元素容器,但只属于一个 CUDA tile code block。Tile 通常是 array 中一部分元素的子集。本节讨论如何将 array 加载到 tile 中以供 tile kernel 使用,以及如何把 tile 存回 array。
后续小节介绍两种加载和存储 tile 的方法:
- Tile-Space Load 和 Store:使用 tile-space index 加载和存储;view object 规定 array 元素如何以可预测的模式映射到 tile;
- Gather 和 Scatter:使用 index tile 或 pointer tile 指示 tile 元素加载时来自 array 的哪个元素,或存储时写入 array 的哪个元素。
**性能说明:**在支持的硬件上,tile-space load 可以由编译器降低为 Tensor Memory Accelerator(TMA)操作,速度显著快于逐元素 gather。(C++ 方面也见 C++ 性能提示。)
程序员必须决定 load 时越界元素取什么值。Python 中越界写会被静默丢弃;C++ 使用 masked variant 时,越界写也会被静默丢弃。
2.4.6.1 Tile-Space Load 和 Store
使用 tile-space load 时,需要创建一个 view object,指定 array 如何划分为由 tile 大小决定的网格区域。这种映射称为 tile-space;tile kernel 可以使用 tile-space index 一次加载或存储一个区域。
Tile-space load 的核心是 array 的 tiled view,它指定 array 元素如何映射到给定大小的 tile。下图中的 tiled view 是一个 partition view:tile-space 中的 tile 互不重叠,大小固定,且 tile 之间没有间隙。
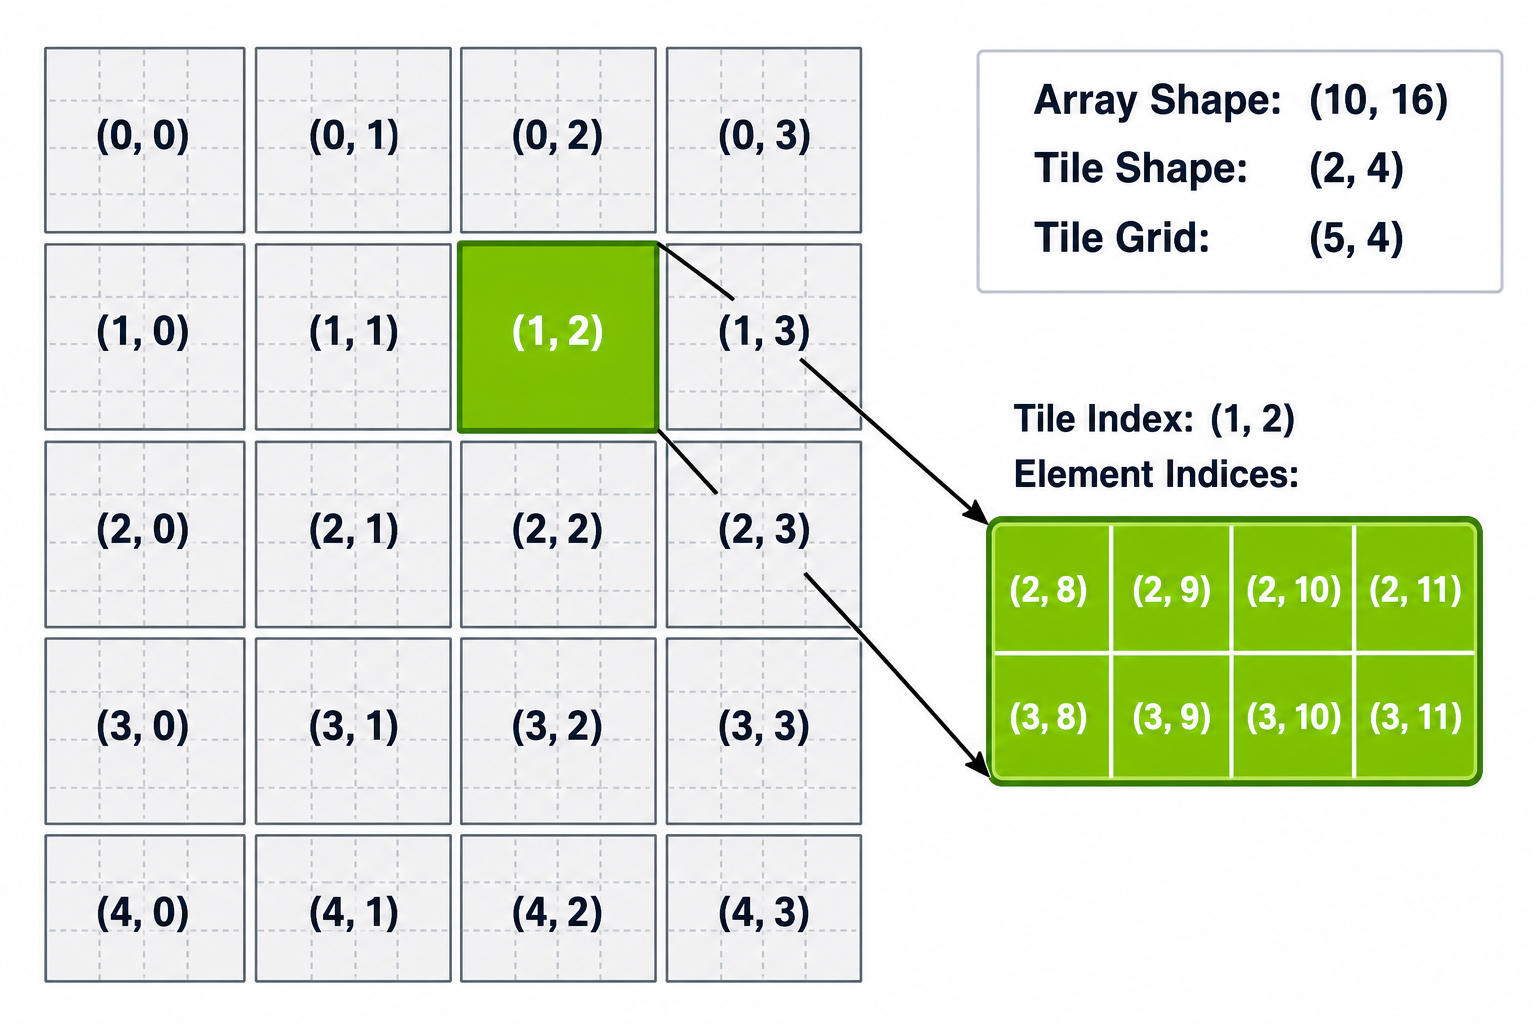
图 19 说明:一个 shape 为 (10, 16) 的二维 array 被划分为 shape 为 (2, 4) 的 tile,得到 shape 为 (5, 4) 的 tile grid。每个单元显示自己的 tile-space index (i, j)。tile-space index (1, 2) 处高亮区域覆盖从元素索引 (2, 8) 到 (3, 11) 的范围。
当 array 维度不能被 tile 完全整除时,跨越 array 边界的 tile 会在一个或多个维度上部分填充。程序员可以指定加载这些 tile 时的行为,详见Tile-Space 边界处理。
注意
此处的示例和描述使用 partition view 演示 tile-space load/store,因为它是 CUDA Tile code 最早支持的 view 类型。CUDA Tile 的后续版本预计会增加其他 view 类型。
2.4.6.1.1 Partition View Load 和 Store
结构化 tile-space load 是在 global memory 与 tile 之间移动数据的首选方式。Kernel 必须先构造定义 tile-space 的 view object,然后按照 tile-space index 一次加载或存储一个 tile。
C++ 中,partition view 分两步构造:
ct::tensor_span:将 raw pointer 与ct::extents配对,为 pointer 提供多维结构;ct::partition_view:将 span 划分为固定大小 tile 的网格,并暴露.load(idx...)/.store(tile, idx...)方法,这些方法使用 tile-space 坐标操作。
Python 中,Array.tiled_view(tile_shape) 返回一个 TiledView,将 array 划分为给定 shape 的 tile。该 view 暴露 .load(index) / .store(index, tile) 方法,接收 tile-space index,直接对应 C++ 的 partition_view。
注意
本节的 C++ 示例都会用
__restrict__注解 pointer 参数,并在 kernel body 开头附近调用ct::assume_aligned(ptr, 16_ic)。这些是重要的性能注解,在2.4.12 C++ 性能提示中进一步介绍。数字 literal 后的_ic(例如128_ic、8_ic)表示编译时常量,详见编译时常量。
C++
__tile_global__ void vec_add(float* __restrict__ a, float* __restrict__ b, float* __restrict__ out) {
    namespace ct = cuda::tiles;
    using namespace ct::literals;

    a   = ct::assume_aligned(a,   16_ic);
    b   = ct::assume_aligned(b,   16_ic);
    out = ct::assume_aligned(out, 16_ic);

    // 第 1 步:为每个 raw pointer 附加 shape。128_ic 表示 128 是编译时常量。
    auto aSpan = ct::tensor_span{a,   ct::extents{128_ic}};
    auto bSpan = ct::tensor_span{b,   ct::extents{128_ic}};
    auto oSpan = ct::tensor_span{out, ct::extents{128_ic}};

    // 第 2 步:将每个 span 划分为固定大小为 8 的 tile-space。
    auto aView = ct::partition_view{aSpan, ct::shape{8_ic}};
    auto bView = ct::partition_view{bSpan, ct::shape{8_ic}};
    auto oView = ct::partition_view{oSpan, ct::shape{8_ic}};

    int  bx    = ct::bid().x;             // 当前 block 沿 .x 的 tile-space index
    auto aTile = aView.load(bx);          // 取 a 中第 bx 个 tile
    auto bTile = bView.load(bx);
    oView.store(aTile + bTile, bx);       // 将 tile 写回 out 中第 bx 个位置
}
Python
@ct.kernel
def vec_add(a, b, c, TILE: ct.Constant[int]):
    a_view = a.tiled_view((TILE,))
    b_view = b.tiled_view((TILE,))
    c_view = c.tiled_view((TILE,))

    bid = ct.bid(0)
    a_tile = a_view.load((bid,))
    b_tile = b_view.load((bid,))
    c_view.store((bid,), a_tile + b_tile)

#### 2.4.6.1.2 Python 单调用 Load 和 Store(Python One-Call Load and Store)

Python 还提供一种单调用形式:在每次 load 和 store 中内联给出 tile shape,而不需要显式 view object。`ct.load(array, index, shape)` 在给定 tile-space index 处读取给定 shape 的 tile;对应的写操作是 `ct.store(array, index, tile)`。

`ct.load`/`ct.store` 与 `Array.tiled_view` 表达的是相同的 tile-space 访问模式,区别在于 tile shape 所在的位置。使用 `Array.tiled_view` 时,tile shape 一次绑定到 view object;使用 `ct.load`/`ct.store` 时,每次调用都内联提供 tile shape。当多个 load/store 重复使用相同 partitioning 时,推荐使用 `tiled_view`;一次性的 load 更简洁时,可以使用 `ct.load`/`ct.store`。

```python
@ct.kernel
def vec_add(a, b, c, TILE: ct.Constant[int]):
    bid = ct.bid(0)                                  # axis 0 上当前 block 的 tile-space index
    a_tile = ct.load(a, index=(bid,), shape=(TILE,))  # 取 a 中第 bid 个 TILE 大小的区域
    b_tile = ct.load(b, index=(bid,), shape=(TILE,))
    ct.store(c, index=(bid,), tile=a_tile + b_tile)   # 将 tile 写回 c 中第 bid 个区域
2.4.6.1.3 Tile-Space 边界处理(Tile-Space Boundary Handling)
在 C++ 中,partition_view 提供未 mask 和 masked 两种形式:
.load(idx...)/.store(tile, idx...)假设 tile 完全位于边界内;部分越界访问属于未定义行为;.load_masked(idx...)/.store_masked(tile, idx...)安全处理部分位于边界外的 tile:.load_masked()默认用 0 填充越界位置,也可以选择其他 padding mode(例如 float tile 使用 NaN);.store_masked()静默丢弃越界写入。
当 array 大小可以被 tile size 完全整除时,推荐使用未 mask 的 load/store variant。需要处理边界时,即使 tile 完全填充,也可以使用 masked variant。
这是本指南第一个 array dimension 为 runtime value 的 C++ 示例。ct::extents{N} 接受 runtime dimension;ct::extents 支持 compile-time(_ic)和 runtime value 的任意组合。因此,span 和 partition view 可以包装只有在 kernel 启动时才知道大小的 array。
在 Python 中,ct.load 接受 padding_mode 参数,用于控制越界元素取值。常用模式包括:
PaddingMode.ZERO:越界元素填充为 0;PaddingMode.UNDETERMINED(默认):越界元素值交给实现决定。当程序员知道 tile 完全在边界内时适合使用。
对于 store,ct.store 总是静默丢弃写向越界位置的操作,不需要 padding_mode 参数。tiled_view 也遵循相同规则,只是它在 view 创建时固定 padding_mode。
C++
__tile_global__ void edge_safe(float* __restrict__ in, float* __restrict__ out, int N) {
    namespace ct = cuda::tiles;
    using namespace ct::literals;

    in  = ct::assume_aligned(in,  16_ic);
    out = ct::assume_aligned(out, 16_ic);

    // ct::extents{N} 使用 runtime dimension;128_ic 仍是编译时值。
    auto inView  = ct::partition_view{ct::tensor_span{in,  ct::extents{N}}, ct::shape{128_ic}};
    auto outView = ct::partition_view{ct::tensor_span{out, ct::extents{N}}, ct::shape{128_ic}};

    int  bx   = ct::bid().x;
    auto tile = inView.load_masked(bx);    // masked load:越界 lane 默认填 0
    outView.store_masked(tile, bx);        // masked store:越界写静默丢弃
}
Python
@ct.kernel
def edge_safe(arr_in, arr_out, TILE: ct.Constant[int]):
    bid = ct.bid(0)
    tile = ct.load(arr_in, index=(bid,), shape=(TILE,),
                   padding_mode=ct.PaddingMode.ZERO)   # 部分越界 tile 的越界 lane 变为 0
    ct.store(arr_out, index=(bid,), tile=tile)           # 越界写静默丢弃
在 C++ kernel 内,.load_masked() 和 .store_masked() 处理部分越界的边缘 tile;在 Python kernel 内,load 上的 PaddingMode.ZERO 保证部分边缘 tile 使用 0 填充,ct.store 静默丢弃超出 array 边界的写入。完整的 padding mode、mask 选项和 padding value 见各语言 API 参考:CUDA Tile C++ view padding和 cuTile Python padding modes。
加载或存储完全位于 array 外部的 tile 属于未定义行为。这里讨论的边界处理只适用于在一个或多个维度上部分越界的 tile。
2.4.6.2 Gather 和 Scatter
Tile-Space Load 和 Store使用 partition view,定义 array 规则、按 block 对齐的 partitioning。当访问模式不规则或依赖数据(例如查找表或 permutation)时,gather 和 scatter 允许 tile 从 array 的非均匀、非连续元素加载或存储到这些元素。
Gather 和 scatter 在 C++ 与 Python 中略有不同:
- Python 使用传给
ct.gather()/ct.scatter()的 integer index tile,并内置边界检查; - C++ 使用传给
ct::load()/ct::store()的 pointer tile,并提供ct::load_masked()、ct::store_masked()变体;这些变体接收 boolean mask tile,以处理 array 边界处的 tile。
在 C++ 中,gather/scatter 通过构造 pointer tile 实现,每个元素一个 pointer,然后将 pointer tile 传给 ct::load() 或 ct::store()。Scalar pointer 与 integer tile 之间的算术操作按元素执行,生成 pointer tile,这是 C++ 中构造 gather/scatter index tile 的标准写法。
在 Python 中,ct.gather 读取 index tile 中每个索引对应的元素。默认开启边界检查:越界索引返回 padding value(默认是 0,也可以用 padding_value= 配置),并可以使用 check_bounds=False 禁用检查。ct.scatter 为每个索引存储一个 value;越界写会静默丢弃。
C++
__tile_global__ void vec_add_gather(int* __restrict__ a, int* __restrict__ b, int* __restrict__ out) {
    namespace ct = cuda::tiles;
    using namespace ct::literals;
    using i32x8 = ct::tile<int, ct::shape<8>>;

    a   = ct::assume_aligned(a,   16_ic);
    b   = ct::assume_aligned(b,   16_ic);
    out = ct::assume_aligned(out, 16_ic);

    int bx       = ct::bid().x;
    auto offsets = 8 * bx + ct::iota<i32x8>();   // 元素级偏移,每个 lane 一个

    // scalar pointer + int tile = pointer tile(每个 offset 一个 pointer)。
    auto aPtrs = a + offsets;
    auto bPtrs = b + offsets;

    auto aTile = ct::load(aPtrs);                // gather:每个 pointer 一次 load
    auto bTile = ct::load(bPtrs);
    ct::store(out + offsets, aTile + bTile);     // scatter:每个 pointer 一次 store
}
Python
@ct.kernel
def vec_add_gather(a, b, c, TILE: ct.Constant[int]):
    bid = ct.bid(0)
    indices = bid * TILE + ct.arange(TILE, dtype=ct.int32)   # 每个 lane 一个元素索引

    a_tile = ct.gather(a, indices)                           # 每个 lane 加载 a[indices[i]]
    b_tile = ct.gather(b, indices)
    ct.scatter(c, indices, a_tile + b_tile)                  # 每个索引向 c 写入一个 value
2.4.6.2.1 Gather 和 Scatter 边界处理(Gather and Scatter Boundary Handling)
Gather/scatter 的边界处理规则不同于 tile-space load/store。
在 Python 中,ct.gather 和 ct.scatter 默认是边界安全的。越界读返回 padding value(默认 0),越界写静默丢弃。当能够证明每个索引都在范围内时,可以禁用边界检查;禁用后,越界访问属于未定义行为。可选的 mask 和 padding-value 参数见 CUDA Tile C++ load operations和 cuTile Python load/store operations。
在 C++ 中不会自动执行边界检查。程序员需要构造 boolean mask(例如将 offsets 与 array length 比较),并将它传给 ct::load_masked 或 ct::store_masked:
__tile_global__ void gather_safe(int* __restrict__ arr, int* __restrict__ out, int N) {
    namespace ct = cuda::tiles;
    using namespace ct::literals;
    using i32x8 = ct::tile<int, ct::shape<8>>;

    arr = ct::assume_aligned(arr, 16_ic);
    out = ct::assume_aligned(out, 16_ic);

    int bx       = ct::bid().x;
    auto offsets = 8 * bx + ct::iota<i32x8>();   // 元素级偏移,每个 lane 一个
    auto mask    = offsets < N;                  // boolean tile:偏移在范围内的位置为 true

    auto ptrs = arr + offsets;                   // pointer tile,每个 offset 一个 pointer
    auto tile = ct::load_masked(ptrs, mask, 0);  // masked lane 使用 padding value 0
    ct::store_masked(out + offsets, tile, mask); // masked lane 跳过 store
}

## 2.4.7 控制流(Control Flow)

从程序员角度看,tile kernel 每个 block 遵循一条控制流路径。条件和循环边界中的 scalar value 驱动控制流;body 中的 tile operation 则由编译器分布到硬件线程上。

并非所有控制流结构都支持。例如,在 tile code 中不允许从循环内部 return。完整限制列表见各语言 API 参考:[CUDA Tile C++ general principles](https://docs.nvidia.com/cuda/cuda-tile-cpp-api-reference/general_principles.html)和 [cuTile Python control flow](https://docs.nvidia.com/cuda/cutile-python/execution.html#control-flow)。

### 2.4.7.1 循环(Loops)

一个常见模式是遍历 array 中的 tile,并依次处理每一个 tile。

在 C++ 中,`ct::irange` 是一个 forward range,表示从下界开始、到上界之前结束、按可选步长递增的整数序列。使用 `ct::irange` 会向编译器提供结构化的迭代边界信息,编译器可能据此更好地优化生成代码。要启用这种优化,循环变量必须通过基于 `ct::irange` 的 range-for expression 绑定。

在 Python 中,tile code 支持内置的 `range()`、`for`、`while` 和嵌套循环。

步长必须严格为正,不支持负步长 range。

下面的单 block kernel 对一维 array 的所有 tile 求和。

#### C++

```cpp
__tile_global__ void tile_sum(float* __restrict__ arr, float* __restrict__ out, int num_tiles) {
    namespace ct = cuda::tiles;
    using namespace ct::literals;
    using f32x8 = ct::tile<float, ct::shape<8>>;

    arr = ct::assume_aligned(arr, 16_ic);
    out = ct::assume_aligned(out, 16_ic);

    auto inView  = ct::partition_view{ct::tensor_span{arr, ct::extents{8 * num_tiles}},
                                      ct::shape{8_ic}};
    auto outView = ct::partition_view{ct::tensor_span{out, ct::extents{8_ic}},
                                      ct::shape{8_ic}};

    auto acc = ct::full<f32x8>(0.0f);
    // 对 ct::irange 使用 range-for,为编译器提供结构化的迭代边界。
    for (auto k : ct::irange(0, num_tiles)) {
        auto tile = inView.load(k);
        acc = acc + tile;                               // 将第 k 个 tile 累加到 acc
    }
    outView.store(acc, 0);                              // 将最终结果作为 out 的第 0 个 tile 写回
}
Python
@ct.kernel
def tile_sum(arr, out, TILE: ct.Constant[int], N_TILES: ct.Constant[int]):
    # 预期 grid 为 (1,),即一个 block 对 arr 的所有 tile 求和。
    acc = ct.zeros((TILE,), dtype=ct.float32)
    for k in range(N_TILES):                            # range() 在 tile code 中原生支持
        tile = ct.load(arr, index=(k,), shape=(TILE,))
        acc = acc + tile                                # 将第 k 个 tile 累加到 acc
    ct.store(out, index=(0,), tile=acc)                 # 将最终结果作为 out 的第 0 个 tile 写回
2.4.7.2 条件分支(Conditionals)
标准的 if / else 条件分支正常工作。由于每个 block 遵循一条控制流路径,warp 内分支发散的考量不适用于 tile kernel。
C++
__tile_global__ void conditional_load(float* __restrict__ arr, float* __restrict__ out, int N) {
    namespace ct = cuda::tiles;
    using namespace ct::literals;
    using f32x8 = ct::tile<float, ct::shape<8>>;

    arr = ct::assume_aligned(arr, 16_ic);
    out = ct::assume_aligned(out, 16_ic);

    auto inView  = ct::partition_view{ct::tensor_span{arr, ct::extents{N}}, ct::shape{8_ic}};
    auto outView = ct::partition_view{ct::tensor_span{out, ct::extents{N}}, ct::shape{8_ic}};

    int bx   = ct::bid().x;
    int nb_x = ct::num_blocks().x;

    auto tile = ct::full<f32x8>(0.0f);    // 最后一个 block 分支的默认值
    // Scalar condition:每个 block 只有一条控制流路径,不需要考虑 divergence。
    if (bx < nb_x - 1) {
        tile = inView.load(bx);           // 除最后一个之外的所有 block
    }
    outView.store_masked(tile, bx);       // 使用 masked 处理可能不完整的最后一个 tile
}
Python
@ct.kernel
def conditional_load(arr, out, TILE: ct.Constant[int]):
    bid = ct.bid(0)
    # Scalar condition:每个 block 只有一条控制流路径,不需要考虑 divergence。
    if bid < ct.num_blocks(0) - 1:
        tile = ct.load(arr, index=(bid,), shape=(TILE,))    # 除最后一个之外的所有 block
    else:
        tile = ct.zeros((TILE,), dtype=ct.float32)          # 最后一个 block:输出 0
    ct.store(out, index=(bid,), tile=tile)
2.4.8 逐元素算术与 Broadcasting(Element-wise Arithmetic and Broadcasting)
Tile 支持标准的逐元素算术。当两个 operand 的 shape 兼容但不同,较小的 operand 会先 broadcast 到匹配的 shape,然后执行操作。
2.4.8.1 Broadcasting
Broadcasting 遵循 NumPy 语义:scalar 会复制到整个 tile;长度为 1 的 singleton dimension 会拉伸到与另一个 operand 的对应维度匹配;低 rank operand 会与高 rank operand 的尾部维度对齐,缺少的前导维度视为 singleton。如果两个对应维度都不是 singleton 且不相等,则操作格式错误。
下面的示例在一次加法中同时展示 singleton 拉伸和 rank promotion:shape 为 8x2 的 rank-2 tile 会先提升为 1x8x2,再与 shape 为 4x1x2 的 rank-3 tile broadcast 到共同 shape 4x8x2。
C++
auto x = ct::iota<ct::tile<int, ct::shape<8, 2>>>();      // 8x2(rank 2)
auto y = ct::iota<ct::tile<int, ct::shape<4, 1, 2>>>();   // 4x1x2(rank 3)
auto z = x + y;                                           // x 提升为 1x8x2,再 broadcast 到 4x8x2
Python
x = ct.full((8, 2),    3, dtype=ct.int32)   # 8x2(rank 2)
y = ct.full((4, 1, 2), 5, dtype=ct.int32)   # 4x1x2(rank 3)
z = x + y                                    # x 提升为 1x8x2,再 broadcast 到 4x8x2
2.4.8.2 算术运算符(Arithmetic Operators)
所有支持的算术运算符都会逐元素作用于 tile,并产生共同 broadcast shape 的新 tile。Scalar 与 tile 组合时,会 broadcast 到每个元素。当 operand 类型不同,优先选择能够保留更多信息的类型:
- **Tile 与 tile 组合:**结果 tile 使用精度或范围更大的类型。例如:
int + float产生float;int16 + int32产生int32。
- **Scalar 与 tile 组合:**如果 scalar 类型可以在 tile 元素类型中精确表示(例如 integer literal
2与inttile 组合,或2.0f与floattile 组合),操作使用 tile 的元素类型。如果 scalar 必须缩窄才能适配 tile 元素类型(例如 literal2.5与inttile 组合),两种语言不同:- Python 将结果提升到能够容纳两者的类型;
- C++ 拒绝该表达式,认为其格式错误。
下面的代码展示 scalar-tile 的差异:
C++
using i32x8 = ct::tile<int, ct::shape<8>>;
i32x8 x = ct::full<i32x8>(3);

x + 2;       // 正确:int literal 与 int tile 元素类型匹配
x + 2.5;     // 格式错误:2.5 必须缩窄为 int
Python
x = ct.full((8,), 3, dtype=ct.int32)

x + 2          # int32:int literal 与 int32 tile dtype 匹配
x + 2.5        # float32:结果提升以容纳两者
实践中,在可能时应将 scalar literal 写成 tile 元素类型;如果希望使用不同精度,则显式转换。tile operand 在 kernel 中加载时也遵循相同规则:
C++
__tile_global__ void elementwise(float* __restrict__ a, float* __restrict__ b, float* __restrict__ out, int N) {
    namespace ct = cuda::tiles;
    using namespace ct::literals;

    a   = ct::assume_aligned(a,   16_ic);
    b   = ct::assume_aligned(b,   16_ic);
    out = ct::assume_aligned(out, 16_ic);

    auto aView = ct::partition_view{ct::tensor_span{a,   ct::extents{N}}, ct::shape{8_ic}};
    auto bView = ct::partition_view{ct::tensor_span{b,   ct::extents{N}}, ct::shape{8_ic}};
    auto cView = ct::partition_view{ct::tensor_span{out, ct::extents{N}}, ct::shape{8_ic}};

    int  bx = ct::bid().x;
    auto x  = aView.load(bx);
    auto y  = bView.load(bx);
    // 2.0f 与 float tile 的元素类型匹配,不需要缩窄转换。
    // Scalar broadcast 到每个元素,然后 + 逐元素运行。
    auto z  = 2.0f * x + y;
    cView.store(z, bx);
}
Python
@ct.kernel
def elementwise(a, b, c, TILE: ct.Constant[int]):
    bid = ct.bid(0)
    x = ct.load(a, index=(bid,), shape=(TILE,))
    y = ct.load(b, index=(bid,), shape=(TILE,))
    # 2.0 是弱类型 float 常量;与 float tile 组合时,结果保持 float。
    # Scalar broadcast 到 tile 的每个元素,然后 + 逐元素运行。
    z = 2.0 * x + y
    ct.store(c, index=(bid,), tile=z)
需要显式控制舍入模式或 subnormal 处理时,CUDA Tile API 提供接受这些参数的数学函数,例如 ct.add、ct::add。
2.4.9 Tile Primitive
Factory function(创建 Tile)、load/store(Tile-Space Load 和 Store)以及逐元素算术(逐元素算术与 Broadcasting)都属于 tile primitive,即语言内置的操作。程序员以 tile 粒度编写这些操作,编译器将其映射到硬件,在可用时也会映射到 tensor core。本节介绍 CUDA tile 提供的其他 primitive。
2.4.9.1 矩阵乘法(Matrix Multiply)
两个 tile 的矩阵乘法是实现两个 array 之间矩阵乘法的基础操作。CUDA Tile 提供两种 tile 矩阵乘法形式:纯矩阵乘法(matmul)a @ b,以及矩阵乘加(matrix multiply-accumulate,mma)a @ b + acc。在 mma 中,accumulator 将一个 K-tile 的部分乘积传递到下一个 K-tile,这对 tiled matrix multiplication 的内层循环很有用。matmul 和 mma 都支持二维矩阵乘法、三维 batched multiply,以及 operand 和 accumulator 数据类型(精度)的混合。rank 与元素类型限制见 API 参考:CUDA Tile C++ matrix multiplication和 cuTile Python matmul。
下面 kernel 中使用的常见模式是:无论输入精度如何,都以 FP32 累加,存储时再转换为输出元素类型。Python 中使用带 FP32 类型 acc 的 ct.mma(a, b, acc);C++ 中使用显式 FP32 accumulator type 的 ct::mma(a, b, acc)。K-loop 运行 ceil(K / tk) 次,因此覆盖 A 的右边缘和 B 的下边缘;部分 K-tile 在 load 时用 0 填充(Python 中使用 PaddingMode.ZERO,C++ 中使用 .load_masked()),C 侧部分 M/N 边缘 tile 则由 store 端丢弃越界元素(Python 中使用 ct.store,C++ 中使用 .store_masked())。
C++
__tile_global__ void gemm(const __half* __restrict__ A, const __half* __restrict__ B, float* __restrict__ C,
                          std::size_t M, std::size_t K, std::size_t N) {
    namespace ct = cuda::tiles;
    using namespace ct::literals;
    using f32_acc = ct::tile<float, ct::shape<32, 32>>;

    A = ct::assume_aligned(A, 16_ic);
    B = ct::assume_aligned(B, 16_ic);
    C = ct::assume_aligned(C, 16_ic);

    constexpr auto tm = 32_ic;
    constexpr auto tn = 32_ic;
    constexpr auto tk = 16_ic;

    auto aView = ct::partition_view{ct::tensor_span{A, ct::extents{M, K}}, ct::shape{tm, tk}};
    auto bView = ct::partition_view{ct::tensor_span{B, ct::extents{K, N}}, ct::shape{tk, tn}};
    auto cView = ct::partition_view{ct::tensor_span{C, ct::extents{M, N}}, ct::shape{tm, tn}};

    auto [bx, by, bz] = ct::bid();
    auto acc = ct::full<f32_acc>(0.0f);                 // FP32 accumulator

    std::size_t num_k = (K + tk - 1) / tk;
    for (auto k : ct::irange(std::size_t{0}, num_k)) {
        acc = ct::mma(aView.load_masked(bx, k),         // 部分 K-tile 用 0 填充
                      bView.load_masked(k, by),
                      acc);                             // acc += a @ b
    }
    cView.store_masked(acc, bx, by);                    // 丢弃越界边缘 lane
}
Python
@ct.kernel
def gemm(A, B, C,
         tm: ct.Constant[int], tn: ct.Constant[int], tk: ct.Constant[int]):
    bx, by = ct.bid(0), ct.bid(1)
    num_k  = ct.num_tiles(A, axis=1, shape=(tm, tk))    # K-tile 数量

    acc = ct.full((tm, tn), 0, dtype=ct.float32)        # FP32 accumulator
    for k in range(num_k):
        a = ct.load(A, index=(bx, k), shape=(tm, tk),
                    padding_mode=ct.PaddingMode.ZERO)   # 部分 K-tile 用 0 填充
        b = ct.load(B, index=(k, by), shape=(tk, tn),
                    padding_mode=ct.PaddingMode.ZERO)
        acc = ct.mma(a, b, acc)                         # acc += a @ b

    ct.store(C, index=(bx, by), tile=acc.astype(C.dtype))  # 转换并存储
2.4.9.2 Reduction 与 Scan(Reductions and Scans)
Reduction 用于将 tile 压缩为一个 scalar 或一行 scalar。计算 softmax 的分母、layer norm 的均值和方差、attention scoring 中的最大值,都涉及 reduction operation。
首先需要记住的是结果 shape。Python 默认删除被 reduction 的 axis(传入 keepdims=True 可保留为长度 1);C++ 始终保留该 axis,因此保持 tile 的 rank。下面两个代码片段都沿 axis 1 对 2x4 tile 做 reduction,区别体现在输出 shape 上。
C++
using namespace ct::literals;
using i32x2x4 = ct::tile<int, ct::shape<2, 4>>;

auto x = ct::iota<i32x2x4>();                         // [[0,1,2,3],[4,5,6,7]]
auto row_sums = ct::sum(x, 1_ic);                     // shape (2, 1),保留 axis
// row_sums == [[6], [22]]
Python
x   = ct.arange(8, dtype=ct.int32).reshape((2, 4))    # [[0,1,2,3],[4,5,6,7]]
s   = ct.sum(x, axis=1)                               # shape (2,),删除 axis
s_k = ct.sum(x, axis=1, keepdims=True)                # shape (2, 1),保留 axis
# s == [6, 22];s_k == [[6], [22]]
Scan 是 running reduction,沿一个 axis 产生累积结果。例如,prefix-sum(cumsum)生成与输入维度相同的输出;给定索引处的值,是指定 axis 上直到(包括)该索引的所有元素之和。各语言支持的完整操作集合见 API 参考:CUDA Tile C++ reductions and scans、cuTile Python reductions和 scans。
2.4.9.3 转置与排列(Transpose and Permutation)
两个相关 primitive 可以在不改变数据的情况下重新排列 tile 的轴:transpose 交换前两个轴,permute 执行任意重排。只要 tile 的逻辑布局需要改变,就会用到它们,例如物化 matmul operand 的转置、交换 attention block 中的行与列,或在 broadcast 前排列好轴。
Python 中,rank-2 tile 上的 ct.transpose(x) 交换两个 axis;更高 rank 的 tile 需要显式传入 axis0 / axis1。ct.permute(x, axes) 接收 axis index tuple。C++ 中,ct::transpose(x) 交换前两个维度(保留尾部维度),ct::permute(x, map) 接收描述新顺序的 ct::dimension_map。
C++
using namespace ct::literals;
using t2d = ct::tile<int, ct::shape<2, 4>>;
using t3d = ct::tile<int, ct::shape<2, 2, 2>>;

auto tx = ct::iota<t2d>();
auto ty = ct::transpose(tx);                                     // shape (4, 2)

auto tz = ct::iota<t3d>();
auto tw = ct::permute(tz, ct::dimension_map{2_ic, 0_ic, 1_ic});  // axes (0,1,2) -> (2,0,1)
Python
tx = ct.arange(8, dtype=ct.int32).reshape((2, 4))
ty = ct.transpose(tx)                                            # shape (4, 2)

tz = ct.arange(8, dtype=ct.int32).reshape((2, 2, 2))
tw = ct.permute(tz, (2, 0, 1))                                  # axes (0,1,2) -> (2,0,1)
2.4.9.4 逐元素选择(Element-wise Selection)
逐元素选择是 conditional 的 tile 形式:给定一个 boolean tile 和两个 operand tile,每个输出元素根据对应 boolean 从两个 operand 中选择一个。Condition 会 broadcast 到 operand shape;operand 类型必须兼容,具体规则见 CUDA Tile C++ select和 cuTile Python selection。Python 写作 ct.where(cond, x, y);C++ 写作 ct::select(cond, lhs, rhs)。
C++
using namespace ct::literals;
auto cond = ct::iota<ct::tile<int, ct::shape<4>>>() < 2;   // {T, T, F, F}
auto t    = ct::full<ct::tile<float, ct::shape<4>>>( 1.0f);
auto f    = ct::full<ct::tile<float, ct::shape<4>>>(-1.0f);
auto r    = ct::select(cond, t, f);                        // {1, 1, -1, -1}
Python
cond    = ct.arange(4, dtype=ct.int32) < 2                 # [T, T, F, F]
x_true  = ct.full((4,),  1.0, dtype=ct.float32)
x_false = ct.full((4,), -1.0, dtype=ct.float32)
result  = ct.where(cond, x_true, x_false)                  # [1, 1, -1, -1]
2.4.9.5 数学函数(Mathematical Functions)
Tile code 中,常见逐元素数学操作作为 ct 命名空间中的函数提供:
add、sub、mul;truediv、floordiv、cdiv;mod;pow;exp、exp2、log、log2;sqrt、rsqrt;sin、cos、tan;sinh、cosh、tanh;minimum、maximum;negative;floor、ceil。
每个函数对输入 tile 逐元素执行操作,并返回相同 shape 的 tile。这些操作也适用于 tile code 中的 scalar。精确细节和完整支持列表见 cuTile Python Math Operations及 CUDA Tile C++ Math Operations。
2.4.10 Atomic Memory Operation
在 tile code 中,有两种情况需要使用 memory atomic:
- **跨 block 竞争(cross-block contention):**每个 block 产生部分结果,并使用 atomic operation 将它与其他 block 的部分结果合并到 global memory 的某个位置;
- **block 内竞争(intra-block contention):**tile 的多个元素被写入 memory 中的同一位置。
对 tile 执行 atomic,会对 tile 的每个元素分别执行一次 atomic update。单个元素的操作是 atomic 的,但整个调用不是 atomic 的;tile 中各个元素的 atomic operation 顺序未指定。
Python 中,atomic 通过 array 的 index 定位目标,使用与 ct.gather 和 ct.scatter 相同的约定。可选参数控制边界检查、memory order 和 thread scope。默认开启边界检查、使用 ACQ_REL 和 device scope,因此普通调用只需传入 array、indices 和 update。TiledView 也暴露相同的 atomic operation 作为 instance method(例如 TiledView.atomic_add(index, update));这些方法通过 tile-space index 定位目标,不返回 value,并在 PTX 中降低为 atomic reduction。当不需要 prior value 时,推荐 TiledView 形式以获得更好性能。
C++ atomic 接收 pointer 和对应 value:单个位置使用 raw pointer 和 scalar;多个位置使用 pointer tile 和 value tile。Memory order 是调用处的编译时 type tag,例如 ct::memory_order_relaxed_t{}。Thread scope 也是同样形式的 type tag;如果省略,则默认使用 system-wide visibility。
2.4.10.1 跨 Block 竞争(Cross-block Contention)
下面的代码中,不同 block 正在写同一个 memory 位置 out,因此发生跨 block 竞争。如果没有 atomic operation,并行运行的 block 会产生错误答案。本例使用 device thread scope(C++ 中为 ct::thread_scope_device_t{},Python 中 thread scope 默认是 device-wide),因为 memory operation 的结果必须对 device 上运行的所有 block 可见。Python kernel 使用 TiledView.atomic_add,因为每个 block 的部分和会累加到 out[0],然后立即丢弃。
C++
__tile_global__ void block_sum(int* __restrict__ arr, int* __restrict__ out, std::size_t N) {
    namespace ct = cuda::tiles;
    using namespace ct::literals;
    constexpr auto TILE = 16_ic;

    arr = ct::assume_aligned(arr, 16_ic);
    out = ct::assume_aligned(out, 16_ic);

    auto aView = ct::partition_view{ct::tensor_span{arr, ct::extents{N}},
                                    ct::shape{TILE}};
    int bid = ct::bid().x;
    auto tile    = aView.load_masked(bid);        // 最后一个部分 tile:越界 lane 默认填 0
    auto partial = ct::sum(tile, 0_ic);           // reduction 为一个元素的 tile

    ct::atomic_add(out, (int)partial,             // 将 scalar 累加到 out[0]
                   ct::memory_order_relaxed_t{},  // 单位置 accumulator,relaxed 足够
                   ct::thread_scope_device_t{});  // 对整个 device 可见
}
Python
@ct.kernel
def block_sum(arr, out, TILE: ct.Constant[int]):
    bid = ct.bid(0)
    # 最后一个部分 tile:越界 lane 默认填 0
    tile    = ct.load(arr, index=(bid,), shape=(TILE,),
                      padding_mode=ct.PaddingMode.ZERO)
    partial = ct.sum(tile)                               # reduction 为 scalar
    out.tiled_view((1,)).atomic_add((0,), partial)       # atomic 累加到 out[0]
2.4.10.2 Block 内竞争(Intra-block Contention)
下面的代码片段中,tile 的所有 value 都被 atomic 加到 memory 中的同一位置,因此发生 block 内竞争。
本例中,ptrs tile 的每个元素都指向 memory 中的同一位置 slot。由 ct::iota<i32x16>() 创建的 tile 中每个元素都会 atomic 加到该 memory 位置的 value 上。tile 对同一 memory address 发起的多个 atomic operation 的执行顺序未指定。使用 block thread scope ct::thread_scope_block_t{},表示 atomic operation 的结果只需要在该 thread block 内可见。
using i32x16 = ct::tile<int, ct::shape<16>>;

int* slot = /* 指向发生竞争的位置 */;

// 16 个 lane 都指向同一地址。加法满足交换律,因此未指定顺序
// 不会影响最终和;由于竞争只发生在一个 block 内,block scope 足够。
auto ptrs = ct::full<ct::tile<int*, ct::shape<16>>>(slot);
ct::atomic_add(ptrs, ct::iota<i32x16>(),
               ct::memory_order_relaxed_t{},
               ct::thread_scope_block_t{});
注意
这个例子仅用于说明。要在一个 block 内将 tile reduction 为 scalar,应优先使用Reduction 操作中展示的 tile reduction。
2.4.10.3 支持的 Atomic Operation(Supported Atomic Operations)
Tile code 支持多种 atomic memory operation,它们的区别在于写入值如何与 memory 中已有的值组合:
atomic_and:对传入值和 memory 中的值逐元素执行 atomic 按位 AND;atomic_or:对传入值和 memory 中的值逐元素执行 atomic 按位 OR;atomic_xor:对传入值和 memory 中的值逐元素执行 atomic 按位 XOR;atomic_max:逐元素比较传入值与 memory 中的值,并将较大值写入 memory;atomic_min:逐元素比较传入值与 memory 中的值,并将较小值写入 memory;atomic_add:将传入值加到 memory 中的值,并将结果写入 memory;atomic_xchng:将传入值写入 memory,并返回写入前 memory 中的值;atomic_cas:逐元素比较 memory 中的值和参数传入的 expected value;如果匹配,则用 desired value 替换 memory 中的值。
所有支持的 atomic memory operation 的完整文档见 CUDA Tile C++ API Reference 的 memory operations或 cuTile Python API Reference 的 atomic。
2.4.11 优化提示(Optimization Hints)
Optimization hint 是附加到 source construct 上的 metadata(例如 tile kernel function、load/store call site 等),用于指导编译器生成代码。Hint 不会改变程序语义:有无 hint,kernel 都会以相同方式编译和运行。因此可以自由添加、删除或调节 hint,而不影响正确性。编译器也可能忽略某个 hint。
Hint 具有两个一般属性:
- **Hint 按 construct 生效。**一个 hint 只适用于它附加到的特定 kernel function 或特定 call expression,不会作用于周围代码;
- **Hint 可以按架构指定。**每个 hint 可以对不同 GPU 架构设置不同 value,也可以设置一个适用于所有 target 的 value。
两种语言暴露 hint 的方式不同:
- C++ 使用放在相关 declaration 或 statement 上的 C++ attribute;
- Python 使用 kernel decorator 和单独 memory-operation call site 上的 keyword argument。
两种语言共享 hint kind 的集合及其控制内容,见Hint Kind。
2.4.11.1 C++ 的 cutile::hint Attribute
C++ 中,hint 使用 cutile::hint C++ attribute 表达:
[[ cutile::hint(arch, kind1=value1, kind2=value2, ...) ]]
第一个参数是 target architecture,使用与 __CUDA_ARCH__ 宏相同的约定编码为 integer(例如 sm_90 为 900,sm_100 为 1000)。特殊值 0 表示与架构无关的 hint,适用于所有 target architecture。其余参数是 kind=value pair,用于指定 hint kind 和 value。
cutile::hint attribute 作用于紧随其后的 construct:
- 对 tile kernel function,将 attribute 放在 function declaration 上;
- 对
ct::load、ct::store和ct::partition_viewload/store 等 memory operation,将 attribute 放在包含该调用的 expression-statement 上。
其他放置位置存在限制,完整规则见 CUDA Tile C++ hint specification。
下面的 kernel 展示两种放置方式:kernel-level hint 为 sm_90 和 sm_100 设置不同的 num_cta_in_cga,expression-statement hint 将一次特定 load 标记为 bandwidth-heavy。
[[ cutile::hint(900,  num_cta_in_cga=4),    // sm_90:倾向每个 cluster 使用 4 个 CTA
   cutile::hint(1000, num_cta_in_cga=8) ]]  // sm_100:倾向每个 cluster 使用 8 个 CTA
__tile_global__ void optimization_hints(float* __restrict__ in,
                                        float* __restrict__ out) {
    namespace ct = cuda::tiles;
    using namespace ct::literals;

    in  = ct::assume_aligned(in,  16_ic);
    out = ct::assume_aligned(out, 16_ic);

    auto inSpan  = ct::tensor_span{in,  ct::extents{128_ic}};
    auto outSpan = ct::tensor_span{out, ct::extents{128_ic}};
    auto inView  = ct::partition_view{inSpan,  ct::shape{8_ic}};
    auto outView = ct::partition_view{outSpan, ct::shape{8_ic}};

    int bx = ct::bid().x;

    // Expression-statement hint:将这次特定 load 标记为 bandwidth-heavy。
    ct::tile<float, ct::shape<8>> tile;
    [[ cutile::hint(0, latency=8) ]]
    tile = inView.load(bx);

    outView.store(tile, bx);
}
当同一个 kind 的多个 hint 作用于同一 construct 时,按架构指定的 hint 会覆盖与架构无关的 hint。
2.4.11.2 Python 的 Decorator 参数与 Call-Site Keyword
Python 以两种方式暴露 hint:
- **Kernel-level hint:**作为
@ct.kernel(...)decorator 的 keyword argument。已编译 kernel object 还具有.replace_hints(**hints)方法,返回一个替换了 hint 的新 kernel;新 kernel 有独立的 JIT cache,因此replace_hints很适合作为 autotuning loop 的基础构件; - **Per-call hint:**作为 memory-operation call site 的 keyword argument,适用于
ct.load/ct.store、TiledView.load/TiledView.store以及ct.gather/ct.scatter。
对于按架构指定的 value,使用 cuda.tile.ByTarget(*, default=..., sm_XXX=..., sm_YYY=...) 包装 value。Architecture key 必须是单引号形式的 sm_<major><minor> 字符串(例如 sm_100 或 sm_120)。普通(非 ByTarget)value 适用于所有 target,相当于 C++ 中 arch=0 的架构无关 hint。
下面的 kernel 是上面 C++ 示例的 Python 对应版本:ByTarget 携带 kernel-level hint,latency=8 keyword 携带 per-call hint,replace_hints 生成无需修改源码的重新调优 kernel。
@ct.kernel(num_ctas=ByTarget(sm_90=4, sm_100=8))
def optimization_hints(in_, out, TILE: ct.Constant[int]):
    bid = ct.bid(0)

    # Per-call hint:这次特定 load 是 bandwidth-heavy。
    tile = ct.load(in_, index=(bid,), shape=(TILE,), latency=8)

    ct.store(out, index=(bid,), tile=tile)


# Autotuning:不修改源码,生成替换 hint 的新 kernel。
# 新 kernel 有自己的 JIT cache。
tuned_kernel = optimization_hints.replace_hints(num_ctas=8)
2.4.11.3 Hint Kind
下面的 hint 在两种语言之间共享。在每个 hint 中,C++ name 和 Python name 是同一个底层 hint 的不同拼写;除此之外,作用位置、取值和含义都相同。
2.4.11.3.1 每个 Cluster 的 CTA 数(CTAs per Cluster)
- C++ name:
num_cta_in_cga(kernel attribute); - Python name:
num_ctas(@ct.kerneldecorator 参数); - 允许的值:
1、2、4、8、16。在sm_80上只有1适用; - **含义:**编译器启动 kernel 时,应优先让每个 cooperative group array(CGA)包含的 cooperative thread array(CTA)数量。
2.4.11.3.2 Occupancy
- C++ name:
occupancy(kernel attribute); - Python name:
occupancy(@ct.kerneldecorator 参数); - **允许的值:**闭区间
[1, 32]中的任意 integer; - **含义:**每个 streaming multiprocessor(SM)的目标 active CTA 数。编译器将此值作为建议,并在生成代码时尝试遵守。
2.4.11.3.3 Memory Access Latency
- C++ name:
latency(放在包含该调用的 expression-statement 上的 attribute); - Python name:
latency(call site 上的 keyword argument); - **适用范围:**tile-space load/store(C++ 中的
ct::partition_view;Python 中的Array.tiled_view和ct.load/ct.store),以及 gather/scatter(C++ 中带 pointer tile 的ct::load/ct::store;Python 中的ct.gather/ct.scatter); - **允许的值:**闭区间
[1, 10]中的任意 integer;1表示较轻的 DRAM traffic,10表示较重的 traffic。较大的 value 通常会使编译器安排更大的 prefetch depth。
2.4.11.3.4 Allow TMA
- C++ name:
allow_tma(放在包含该调用的 expression-statement 上的 attribute); - Python name:
allow_tma(call site 上的 keyword argument); - **适用范围:**只适用于 tile-space load/store(C++ 中的
ct::partition_view;Python 中的Array.tiled_view和ct.load/ct.store)。Gather 和 scatter 不接受该 hint; - **允许的值:**C++ 为
true/false,Python 为True/False。默认允许 TMA;在支持 TMA 的硬件上,将该 hint 设为false/False会指示编译器不要把这次特定 load 或 store 降低为 TMA。
2.4.12 C++ 性能提示(C++ Performance Tips)
本指南中的 C++ kernel 都使用同一组注解和惯用写法。本节解释它们的作用以及重要原因。
2.4.12.1 对 Memory 中的 Array 使用 __restrict__ Pointer
__restrict__ 关键字告诉编译器:在 pointer 的生命周期内,通过该 pointer 访问的 memory 区域只会通过该 pointer 访问,详见 5.4.1.4 节。
在 tile C++ 中,对于满足这些条件的 memory array,给指向它们的 pointer 标记 __restrict__,对于获得良好的 memory-operation 性能非常重要。
先考虑一个不使用 __restrict__ 的 array pointer 执行逐元素复制的例子:
__tile_global__ void tile_elementwise_copy(float* out, float const* in) {
    namespace ct = cuda::tiles;

    using f32x64 = ct::tile<float, ct::shape<64>>;
    using i32x64 = ct::tile<int, ct::shape<64>>;

    auto inPtrs  = in  + 64 * ct::bid().x + ct::iota<i32x64>();
    auto outPtrs = out + 64 * ct::bid().x + ct::iota<i32x64>();

    auto data = ct::load(inPtrs);   // (1)
    ct::store(outPtrs, data);       // (2)
}
通常可以忽略编译器如何并行化 tile operation。但这里分析它,是为了理解为什么使用不重叠的 array 能让编译器生成性能更好的代码。
考虑编译器如何并行化 load 和 store tile operation。如果输入和输出 array 不重叠,load 可以被并行化为一组相互独立的 memory read operation。类似地,store 可以被并行化为多个 memory write operation,每个 write 只依赖于它要写入的数据元素对应的 load operation。
然而,如果输入和输出 array 可能重叠,编译器就必须保证整个 tile 的所有 memory load operation 完成后,才能发出任何 memory store operation,以确保程序语义正确。否则,某个 store operation 可能先执行并覆盖一个元素,而该元素尚未在 load operation 中读取,导致程序执行错误。这会限制编译器交错读写的能力,因为所有 read 必须完成后才能发出任何 write。
简而言之,当编译器无法保证 array 不重叠时,必须生成更保守的代码。因此,使用不重叠的 array,并在 pointer 上用 __restrict__ 关键字将这一信息告知编译器,有助于获得最佳性能。
如果 memory 区域可能通过另一个 pointer 访问,却仍给 pointer 标记 __restrict__,将导致未定义行为。
2.4.12.2 将 Array Pointer 标记为 16 字节对齐
使用 ct::assume_aligned 将 array pointer 标记为 16 字节对齐:
__tile_global__ void foo(float* __restrict__ in) {
    namespace ct = cuda::tiles;
    using namespace ct::literals;

    in = ct::assume_aligned(in, 16_ic);

    ct::tensor_span t{in, ct::extents{256_ic, 256_ic}};
    ct::partition_view{t, ct::shape{4_ic, 4_ic}};

    // ...
}
这个对齐保证是 ct::partition_view 使用 Tensor Memory Accelerator(TMA)所必需的。运行时使用这种技术时,必须提供 16 字节对齐的 pointer,否则行为未定义。
CUDA memory allocator(例如 cudaMalloc)返回的 pointer 保证至少按 16 字节对齐。
2.4.12.3 优先使用 ct::partition_view 访问 Memory
对于结构化 memory access,优先使用 ct::partition_view,而不是 gather/scatter 形式的 ct::load 和 ct::store。在支持的硬件上,基于 view 的形式可以降低为 Tensor Memory Accelerator(TMA),速度显著快于逐元素 gather。Gather/scatter 的背景见 Gather 和 Scatter。
2.4.12.4 对有界循环使用 ct::irange
遍历固定范围时,使用 ct::irange 而不是普通的 for loop。结构化形式让编译器可以执行 pipeline 和 vectorization 等优化;当循环边界和步长是编译器无法解析的 integer expression 时,这些优化不可用(见控制流):
for (auto idx : ct::irange(lowerBound, upperBound, step)) {
    // ...
}